I can’t tell you how many times I’ve been on the mountain and found friends or strangers, new or old to snowboarding, with the skirts on their pants tucked into their boots! This may be the number one reason why so many of us have experienced pain and discomfort while snowboarding.
Almost all snowboarding pants these days have a hook on the front of the skirt, the inner lining inside the bottom of your snowboard pants. The purpose of this hook is to grab onto your boot laces, so the skirt doesn’t ride up while riding. The skirt has rubber stitching on the inside of it to help it grip to the outside of your boots. The hook and skirt work together to keep snow our of your boots.
However, if you have the skirt tucked into your boots, not only can snow pack in at the top of your boot, it will inevitably melt (most likely on your next trip into the lodge, if not sooner) and your boot and sock will get wet, your feet will get cold, and your day can be miserable as a result.
Furthermore, if the skirt is tucked in, the hook will also be pressed against your shin by the tongue of your boot when you tighten the laces or Boa. This piece of hook-shaped metal is mistakenly taken as “cramping” by most but is in fact the pain one feels when a piece of metal is digging into their skin!
By pulling the skirt out and using it properly around the outside of your boot, pulled down to just above the upper strap on your bindings, you will have just changed your entire experience snowboarding. It’s that much of a game changer.
Next, tighten up your boots. Make them snug enough to where you are almost cutting off the circulation to your feet, but not quite. Little movement of the foot inside the boot means maximum control.
Okay, I realize that the camera angle sucks when I’m showing the boot stuff, and pretty much overall, but I’m nearly on dial-up here in the mountains this video took overnight to upload, so enjoy this one for now, and I promise I’ll update it with a better one soon!
How to layer your Lower Layers:
- If you wear a knee brace, put this on first, so it’s in direct contact with the skin.
TIP: Tighten straps when the muscle you’re tightening is in a mostly relaxed position. (i.e. tighten around quad when knee is bent at just under 90º and around calf when leg is extended almost straight.) Doing it in this fashion will minimize movement of the brace while you ride.
- Put your socks on. If they overlap a knee brace, put your socks over the knee brace.
- If it’s cold enough, put your long underwear on.
- Now put your pants on.
It’s highly recommended you wear a belt in addition to any velcro straps that may be built into your pants.
- Put your boots on. STOP!!!
PRACTICE THIS EVERY TIME YOU RIDE:
A) Pull your LONG UNDERWEAR UP ABOVE THE BOOT LINE
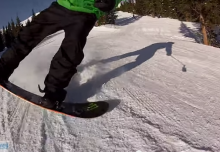
B) Pull your PANTS SKIRT OUT OF YOUR BOOTS ENTIRELY
C)ONLY YOUR SOCKS SHOULD BE INSIDE OF YOUR BOOTS
- Tighten your boot liner.
- Tighten the outer shell of boot.
TIP: No matter what kind of boots you wear, you will want to give them another cinch after you’ve walked up to the chair lift, and likely again after your first run or two. This practice will keep your boots snug and performance at a maximum!
TIP: If you wear Boa style boots, rock slightly forward and backward while tightening, till nice and snug. Rocking is a method I’ve used since switching to Boa style boots and it’s helped me get a better fit right away so I can start off with my best run and don’t find myself cranking away at them all day.
- Pull your boot skirt around your boot, keeping it just above the line where your upper strap comes across your boot when in your bindings.
- You’re ready to ride!
How to layer your Upper Layers:
- If you wear wrist or elbow braces, put these on first. Braces should always be in direct contact with the skin.
- Put your thin layer on (the top part of your long underwear, usually a long-sleeve).
- Put your shirt on over your thin layer, so you can rep your style!
- If it’s cold enough to warrant a mid layer, then put this on next.
- If you wear a back protector, put this on over your shirt or mid layer.
- Put your shell on (a.k.a. your outermost layer, jacket/coat).
- Tighten your wrist straps on jacket as tight as you can stand around your wrists.
- Put your gloves on, overlapping your jacket with gloves. This maximizes warmth in your hands and minimizes the likelihood of snow getting in.
- Put your helmet/beanie & goggles/shades on and go rock it!!!
Related Articles

1 Comment
-
The buckles also work for ski boots. Clip to the plastic of the second upper buckle underneath the buckle. This will prevent snow getting in and also keep you a little warmer in the process.